Importing Existing Libraries to Your Connected Workspace
Altium Designer, in conjunction with your connected Workspace, provides a streamlined and highly automated process to quickly import your existing libraries to that Workspace. The interface to this process – the Library Importer – presents a one-click solution that automatically analyses the selected libraries and imports them to the Workspace to which you are actively connected.
Catering for all types of libraries, relating to older component management methodologies (SchLib, PcbLib, IntLib, DbLib, SVNDbLib), the Library Importer is a dedicated solution for quickly building your company's Workspace component library so you can benefit from their many advantages – high-integrity, centralized storage and management, ease of design reuse, real-time supply-chain information.
The Library Importer offers a minimalist Simple interface mode where the selected database and file-based component libraries are imported to Workspace components through a single step, while the importer automatically takes care of type classification, the target source folder, parameter inclusion and value type, and the transfer of all relevant data. The interface is also available in an Advanced mode that provides a full preview of the proposed library import, and access to its related data and settings. And while the import is a single-click process by default, the importer also offers advanced configuration options through the Properties panel for enhanced control over exactly how that import is performed.
What Gets Imported?
All information that is present in an original source library is imported to the Workspace components, including all referenced domain models (schematic symbols, PCB footprints, simulation models), parametric information, assigned part choices, datasheet files, etc. Component Templates are also created where necessary, and may then be refined and used for subsequent library imports.
If your original components have multiple PCB footprints defined, the Library Importer will bring those models across and keep the current default footprint. And if you only work with PCB libraries – your only concern is PCB layout – then the Library Importer supports import of just those libraries, or it can be switched to a models-only import mode where specified models types are imported from integrated or database libraries. Libraries that include multiple component types (monolithic libraries) are automatically detected and processed as well.
While library import process needs to deal with database and file-based library sources that may use a range of formatting standards, its automated analysis processes detect the types of components in the source library (resistor, capacitor, etc.,) and also the parameters names and their value types (Volts, Ohms, etc.). The system conducts and handles a number of validations, for example, to ensure no duplicate IDs for the resulting Workspace library components, or to ensure no duplicate models or component templates are created, and that such entities are reused across (linked to) components where needed. And if issues do arise, the system flags them, with suggestions on how to resolve those issues, aiming to get the import back on track as quickly, and as smoothly as possible.
Library types that can be imported are:
- Schematic Library (
*.SchLib). - PCB Footprint Library (
*.PcbLib). - Integrated Library (
*.IntLib) - Database Library (
*.DbLib). - SVN Database Library (
*.SVNDbLib).
Accessing the Library Importer
The Library Importer is available when you are connected to a Workspace. To access the importer in its Simple mode:
-
In the Components panel, choose the Import Library option from the
 menu. If a database or file-based library is currently selected in the panel's Categories column (or in the top drop-down menu when the panel is in compact mode), the Library Importer will open for this library. When a Workspace library component type is selected, the standard Windows Open dialog will open to browse to and select a library file to be imported.
 - Right-click on a library file in the Projects panel and select Import Library from the context menu.
- Select Tools » Import Library in the schematic symbol or PCB footprint editor when a local library file is opened.
- Select File » Import Library or Tools » Import Library in the Database Library Editor.
- In the Available File-based Libraries dialog, select a library entry on the Installed tab and then click the Import control.
- Drag and drop a library file from a Windows folder onto the Explorer panel.
The Simple mode provides options to immediately import the selected library (![]() ) or open the Library Importer in its full GUI mode (
) or open the Library Importer in its full GUI mode (![]() ).
).
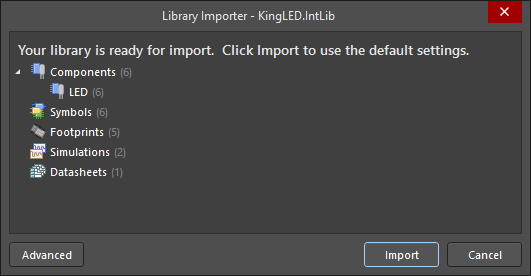
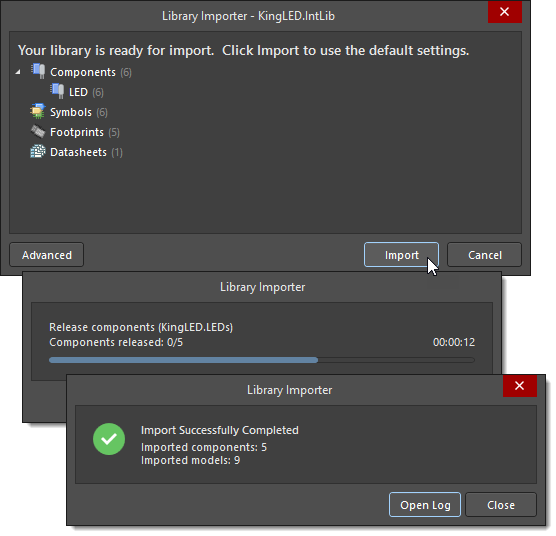
The Library Importer when accessed in its Simple one-click import mode.
To directly access the Library Importer in its Advanced interface mode, select File » Library Importer from the main menu.
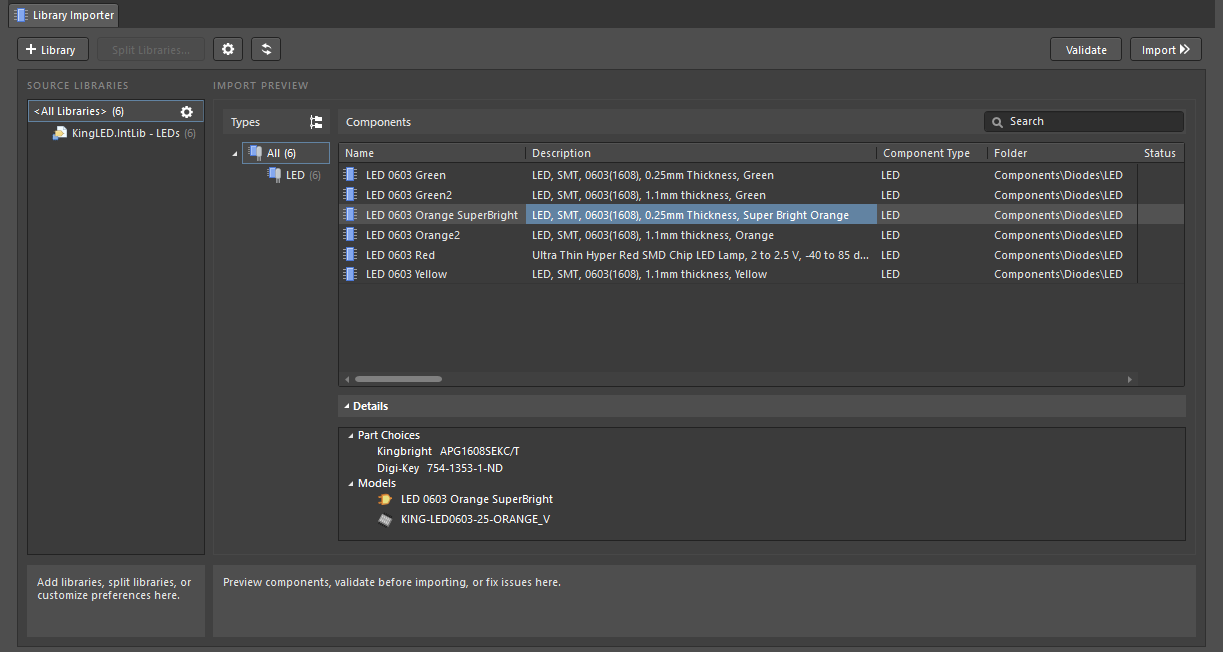
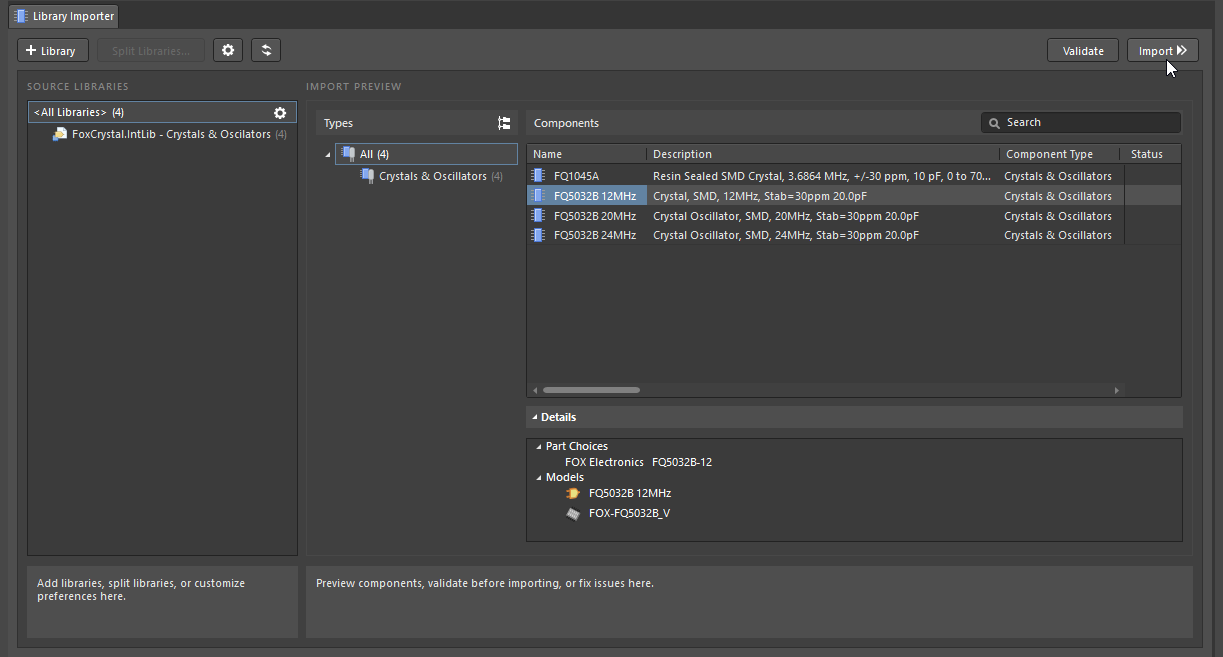
The Library Importer when accessed in its full Advanced interface mode also supports a one-click import process.
Simple Mode
The Library Importer's Simple mode preselects all aspects of the import process based on its analysis of the source library and the connected Workspace. The Library Importer dialog then presents a summary of the import structure, including a total number count for each item type. The library import is performed as a single step from the ![]() command.
command.
This Simple interface mode will suit most common source library formats, which tend to contain common component types (resistors, capacitors, integrated circuits, etc.) and standardized parameter values. During the initial analysis process, the system deduces the type of components within the library based on Designator or parameter keywords (LD?, LED, etc.,) then locates a corresponding Component Template in the target Workspace (LED). This Template is applied to the import of those components, which then specifies the import settings such as a target folder (Components/LED), parameter mapping, parameter value units, and so on – suitable templates are available in the Workspace if the sample data including option was selected during activation of an Altium 365 Workspace or installation of Altium On-Prem Enterprise Server.
This Simple interface mode will suit most common source library formats, which tend to contain common component types (resistors, capacitors, integrated circuits, etc.,) and standardized parameter values. During the initial analysis process, the system deduces the type of components within the library based on Designator or parameter keywords (LD?, LED, etc.,) then locates a corresponding Component Template in the target Workspace (LED). This Template is applied to the import of those components, which then specifies the import settings such as target folder (Components/LED), parameter mapping, parameter value units, and so on – suitable templates are available in the Workspace if the sample data including option was selected during activation of an Altium 365 Workspace or installation of Altium NEXUS Server.
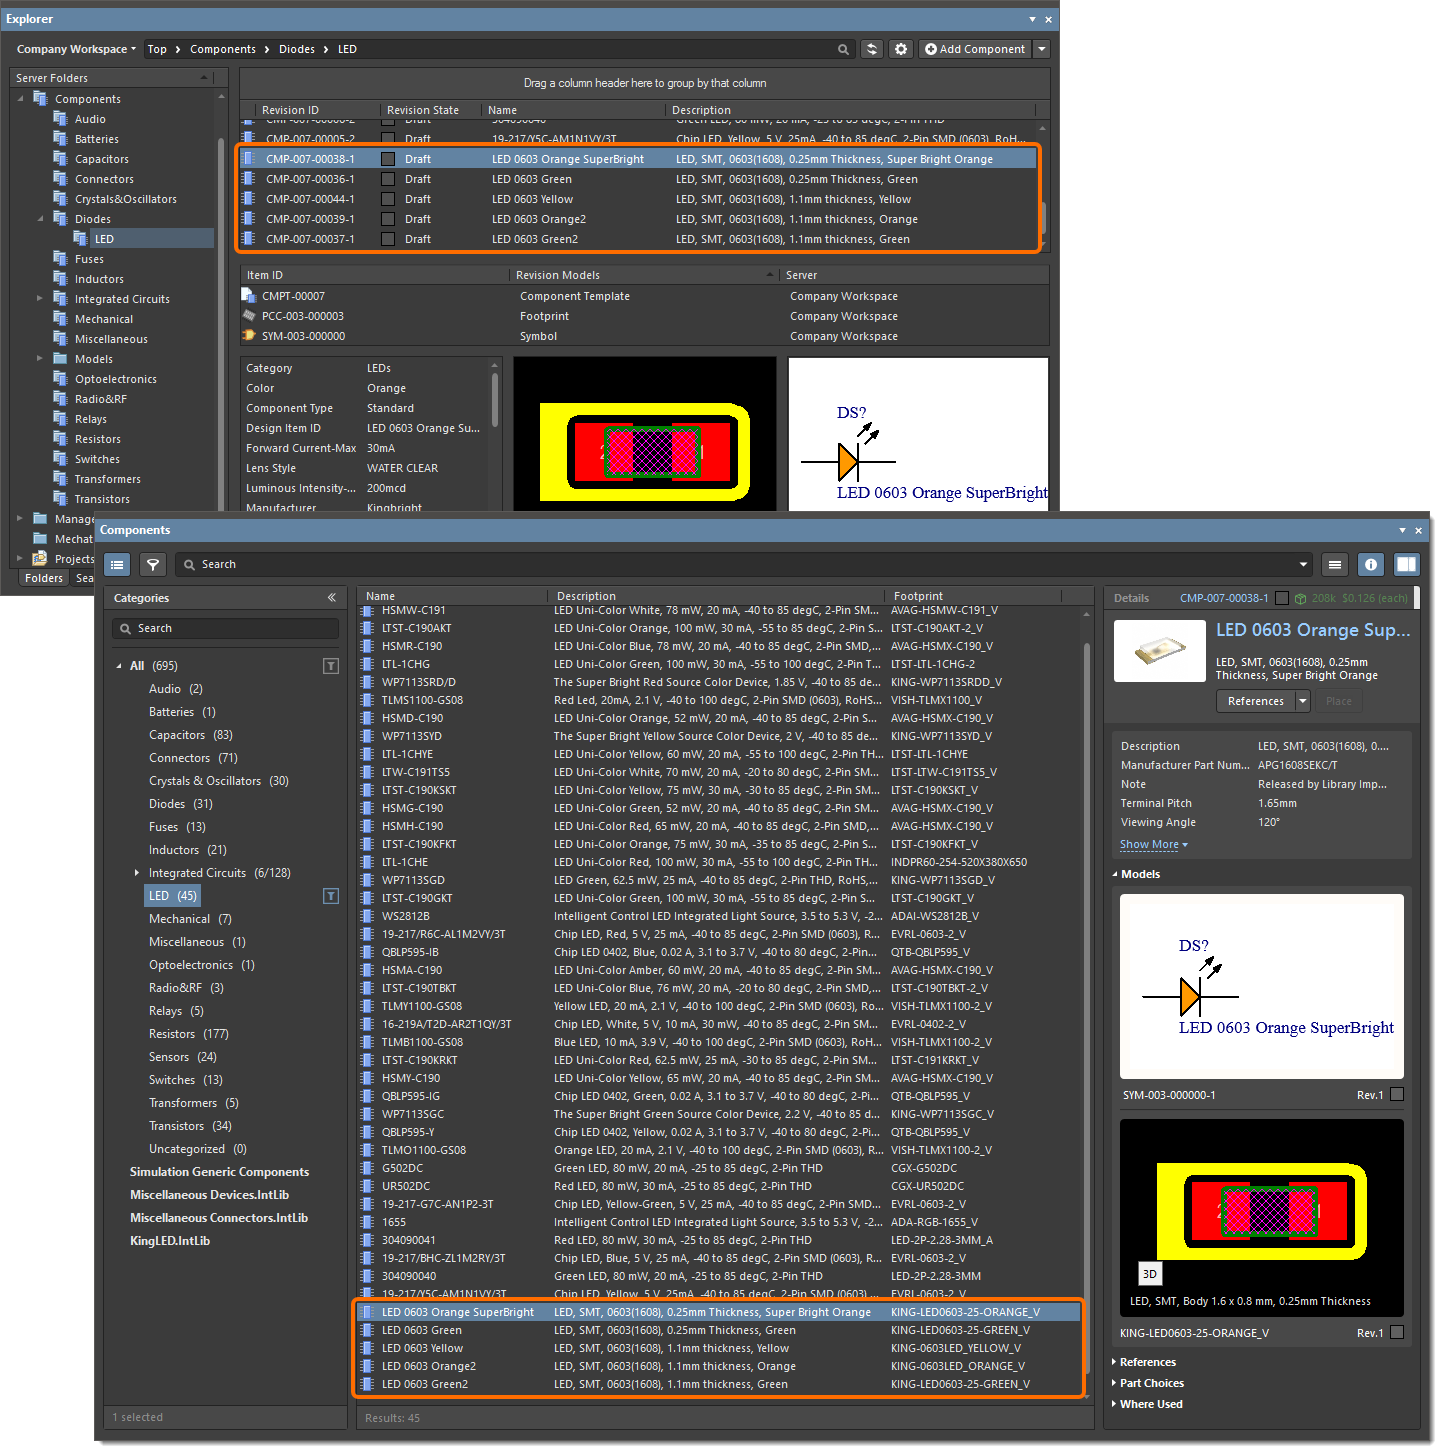
The results of the library import, as newly created Workspace components, can be seen in both the Explorer and Components panels. Imported components include all models, parameters as interpreted by the applied Component Template(s), Part Choices derived from Supplier Link source data, and any reference links or files.
Notable points regarding the library import process are:
-
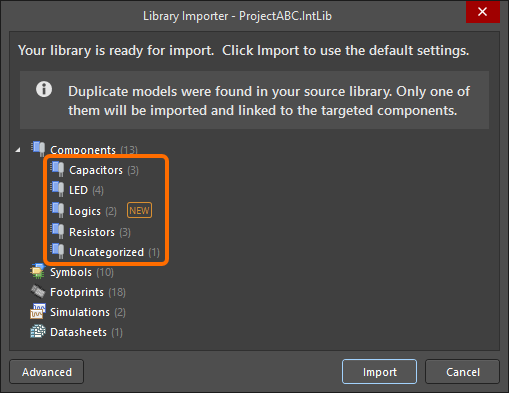
Monolithic libraries (those that contain multiple types of components) are automatically split into subgroups, where each group represents a type of component found in that library. The groups are processed as individual libraries.
- A source library with an unrecognizable (undetected) component type will be imported without interpretation, as unassigned component types in a
Components/UncategorizedWorkspace folder. Before the import is run, this can be resolved by applying Designator Mapping or Parameter Grouping in the Advanced (full UI) mode. Alternatively, you can proceed with the import and then modify the component's settings and folder at a later time, through the Explorer panel. - The library import process includes an automatic component Validation stage. Components that trigger a validation error will be skipped.
- If duplicate models are detected in the source library to be imported, only one of these models will be imported and linked to the resulted components in the target Workspace. An appropriate notification will be shown at the top of the Library Importer dialog.
- Any errors the process has encountered can be viewed in the Importing Report, available from the
 button when the import has been completed.
Advanced Mode
The Library Importer's full GUI is presented when in Advanced mode, which offers detailed control over the management of libraries, component types, and component parameters. When combined with the Properties panel, the import of component libraries to the Workspace can be configured to your specific needs. Note that the importer's settings can be saved and restored by exporting/importing configuration files.
Advanced mode is enabled when the Library Importer is opened from the File » Library Importer command, or when the ![]() button is selected while in Simple mode. Libraries are added to the importer's SOURCE LIBRARIES section (if not already populated) by dragging and dropping a library file onto the area, right-clicking on
button is selected while in Simple mode. Libraries are added to the importer's SOURCE LIBRARIES section (if not already populated) by dragging and dropping a library file onto the area, right-clicking on <All Libraries> then selecting Add Library from the context menu, or by selecting the ![]() button.
button.
The Import Preview section lists component type groups identified from the source libraries – as Types (![]() ) or the proposed Folder Structure (
) or the proposed Folder Structure (![]() ) and includes a parameter-based grid view of those components (Components). Parameter values in the grid can be edited on the fly, which avoids the need to open and edit the source library. The lower Details area includes additional information sourced from the currently selected component – Part Choices, Models, and Datasheets.
) and includes a parameter-based grid view of those components (Components). Parameter values in the grid can be edited on the fly, which avoids the need to open and edit the source library. The lower Details area includes additional information sourced from the currently selected component – Part Choices, Models, and Datasheets.
Regardless of the detailed options and data presented in the interface, the importer's Advanced view can be used in the same manner as the Simple view – just click the ![]() button to invoke the import process, without intervention. As in the Simple view process, the importer has analyzed the library, deduced the type of components it contains, and applied the correct Component Template. In turn, the template determines the Workspace target folder, the applied Naming Schemes and Lifecycle Definitions, and parameter mapping/interpretation.
button to invoke the import process, without intervention. As in the Simple view process, the importer has analyzed the library, deduced the type of components it contains, and applied the correct Component Template. In turn, the template determines the Workspace target folder, the applied Naming Schemes and Lifecycle Definitions, and parameter mapping/interpretation.
Monolithic Libraries
Source libraries that contain multiple component types are detected by the importer's analysis routines and segregated into sub-library groups, where they can be processed as individual type libraries. The component type detection is based on the source component Designators (R?, C?, etc.,) and also keywords (Resistor, Res, etc.,) contained in the other main component parameters (Description, ID, etc.).
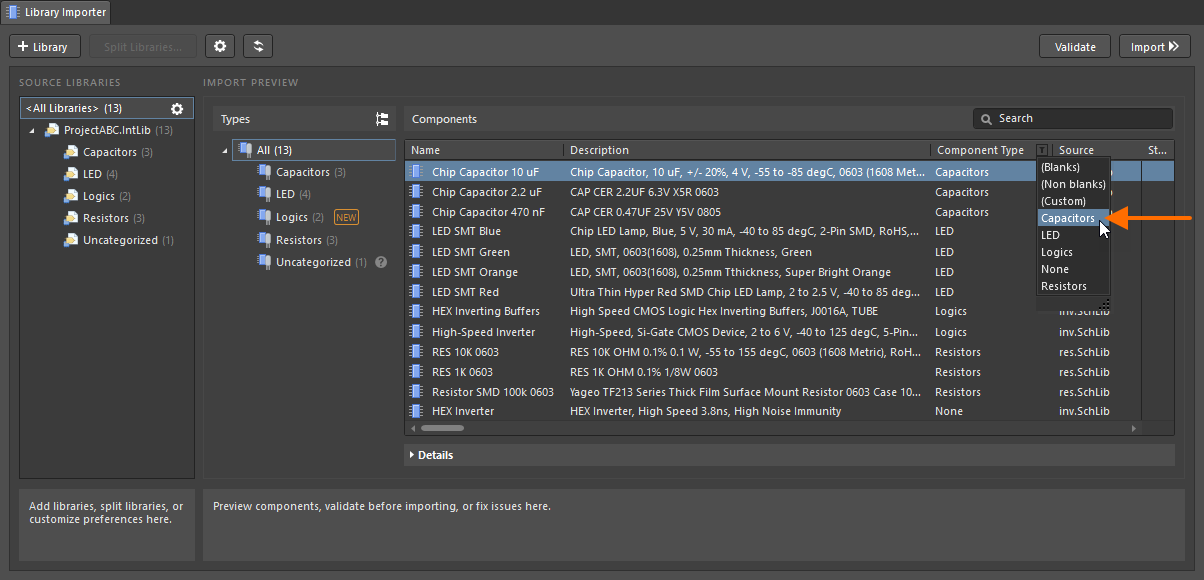
In the example shown below, the source library (ProjectABC.IntLib) has been 'split' automatically according to the detected component types (Capacitors, Resistors, etc.,), which can be selected in the Folder Structure column (or Types column) to preview their constituent component entries in the Components grid.
Note that the presentation of the Components listing may be changed in several ways:
- Click on a column header entry to reorder the list by that parameter column, and then click again to reverse the order.
- From the header right-click context menu:
- Choose Clear Sorting to revert the listing order to its default setting.
- Choose Best Fit to match a particular column width to its contents.
- Choose Select Best Fit All Columns to match all available columns to the width of their content.
- Choose Select Columns to access the Select Columns dialog, where parameter columns can be enabled, disabled and their list positions reordered.
-
Click on the Filter icon (
 ) within a header entry to restrict the listing to an available parameter column value, blank/non-blank values, or a Custom filter setting. The applied filter is shown at the bottom of the listing where it can be enabled/disabled (using its associated checkbox), modified in the Filter Editor, or deleted. Selecting All via the header filter icon (
 ) will also remove the applied filter.
Uncategorized Components
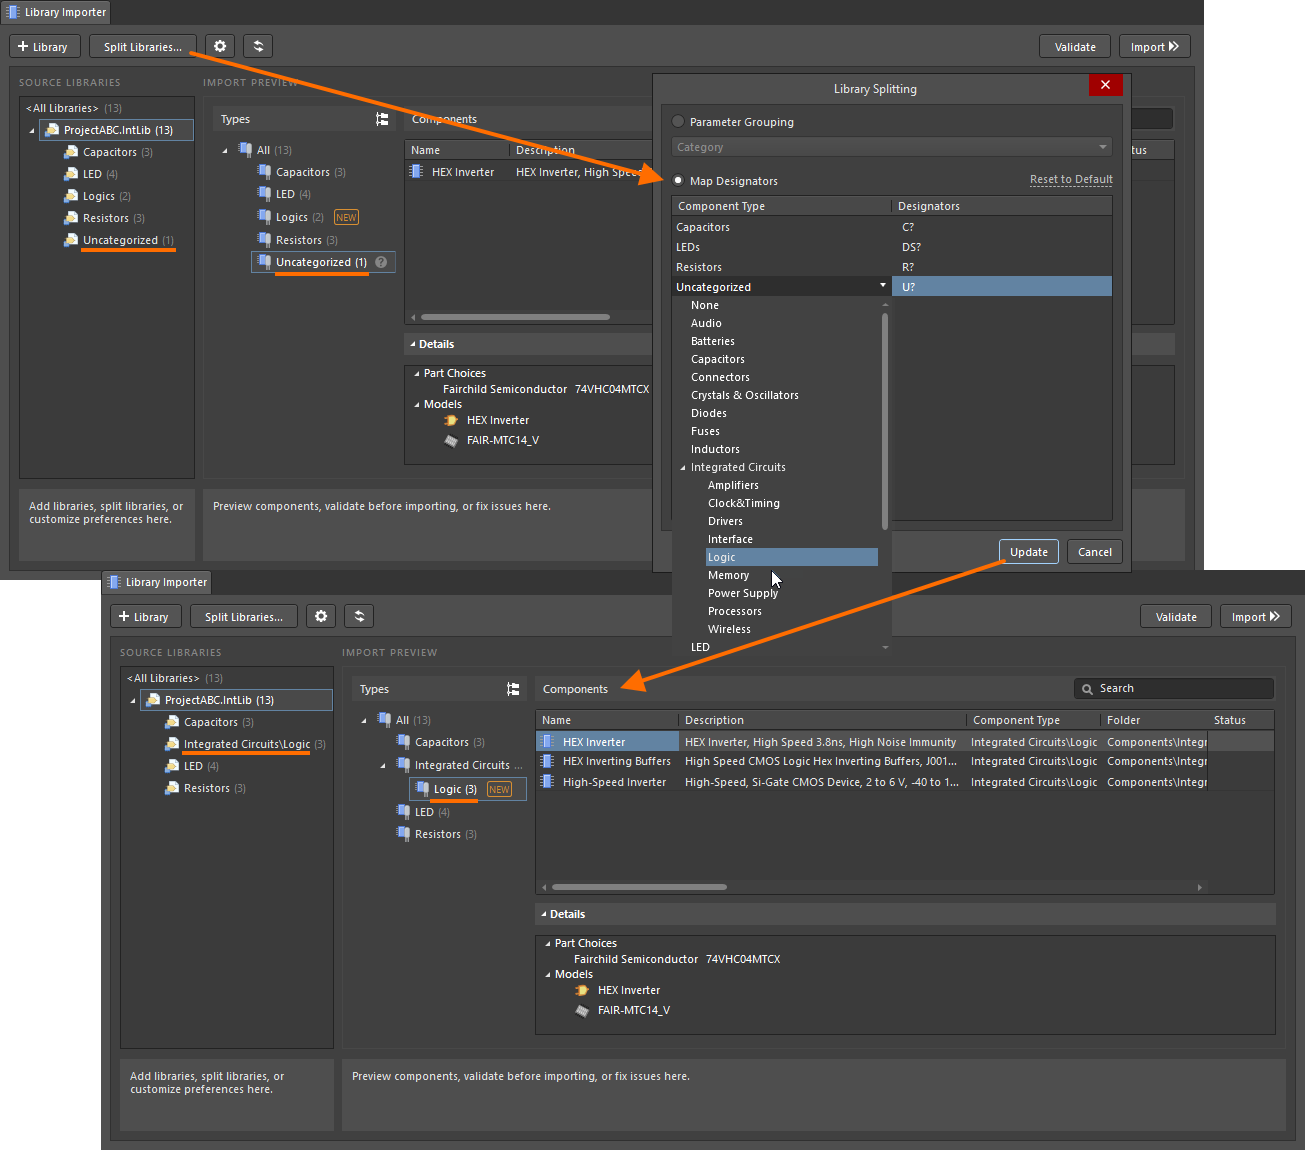
If one library sub-group entry is named Uncategorized (and listed as Uncategorized under Types or Folder Structure and accompanied with the ![]() icon), this indicates that the importer could not detect and assign a type to that group of components – the Component Type is effectively set to
icon), this indicates that the importer could not detect and assign a type to that group of components – the Component Type is effectively set to None. In this case, the undetected components (Inverter logic ICs) use an unrecognized Designator prefix (U?) and their parameters do not contain detected keywords such as IC, logic, etc.
This issue can be addressed by manually mapping the designators used for those components to the desired component type in the Library Splitting dialog, which is accessed from the ![]() button – available when the source library (
button – available when the source library (ProjectABC.IntLib) is selected. The Library Splitting dialog, with default values, provides controls to set custom library grouping options for uncategorized components based on designator mapping by the component types and parameter-based splitting.
With the dialog's Map Designators option selected, choose the component type option that applies to the uncategorized components from the Component Type drop-down list (all available component types are included). Confirm the completed type-designator mapping (the Logic component type to U? designators) with the ![]() button.
button.
With the component type now specified by the applied mapping, the importer will use the matching Component Template (Logic) to configure the library import as defined by the template settings (folder, naming, etc.).
Note that thanks to the flexibility of the Library Importer settings, a new (uncategorized) type of component library can be imported with the entire infrastructure required for future imports of that library type. By choosing a suitable import configuration – new Component Type, Component Template, target folder, parameter mapping and parameter Value unit types – the only requirement for the next import of that library type is to select the previously defined Component Type. The selected Component Type will then determine all other aspects of the import.
Exclude from Importer
You also can exclude specific component types from the import. To exclude a component type, in the Types list, right-click on the component type you want to exclude then select Exclude from Importer from the context menu – change the column listing from Folder Structure to Types if desired (![]() ).
).
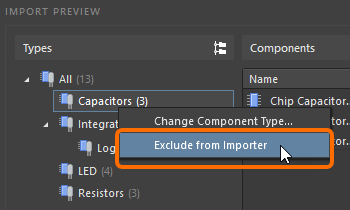
The excluded component type will be grayed out in the Types list. To view the excluded component(s) in the grid, click Show Excluded Component (n), where n denotes the number of excluded components.
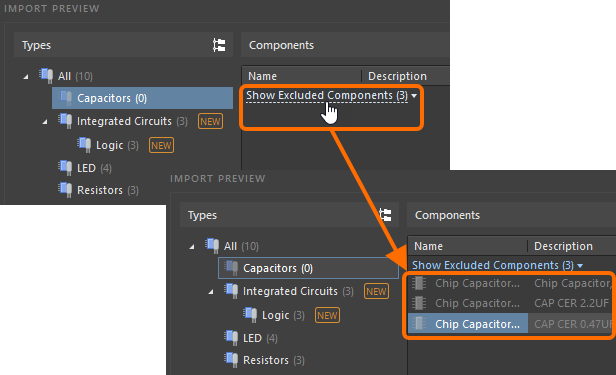
Include to Importer
If you have excluded a component type from the import by using the above described Exclude from Importer command and you need to include that component type, after all, right-click on the grayed-out component type in the Types (or Folder Structure) list then select Include to Importer from the context menu. The component type will once again display in the Types list denoting it is not excluded.
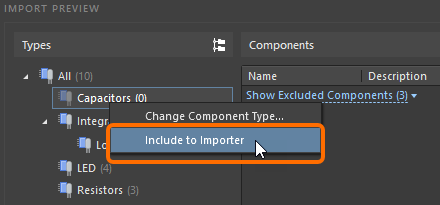
Validation Errors and Warnings
Components that will not be imported to the Workspace correctly, or not at all, are indicated by warning or error tags in the Advanced UI when the Library Importer is run (![]() ), or an import Validation is performed (
), or an import Validation is performed (![]() ). Validation also checks for empty Workspace folder paths, conflicting system parameters, and duplicate models. A Fatal error will block the import.
). Validation also checks for empty Workspace folder paths, conflicting system parameters, and duplicate models. A Fatal error will block the import.
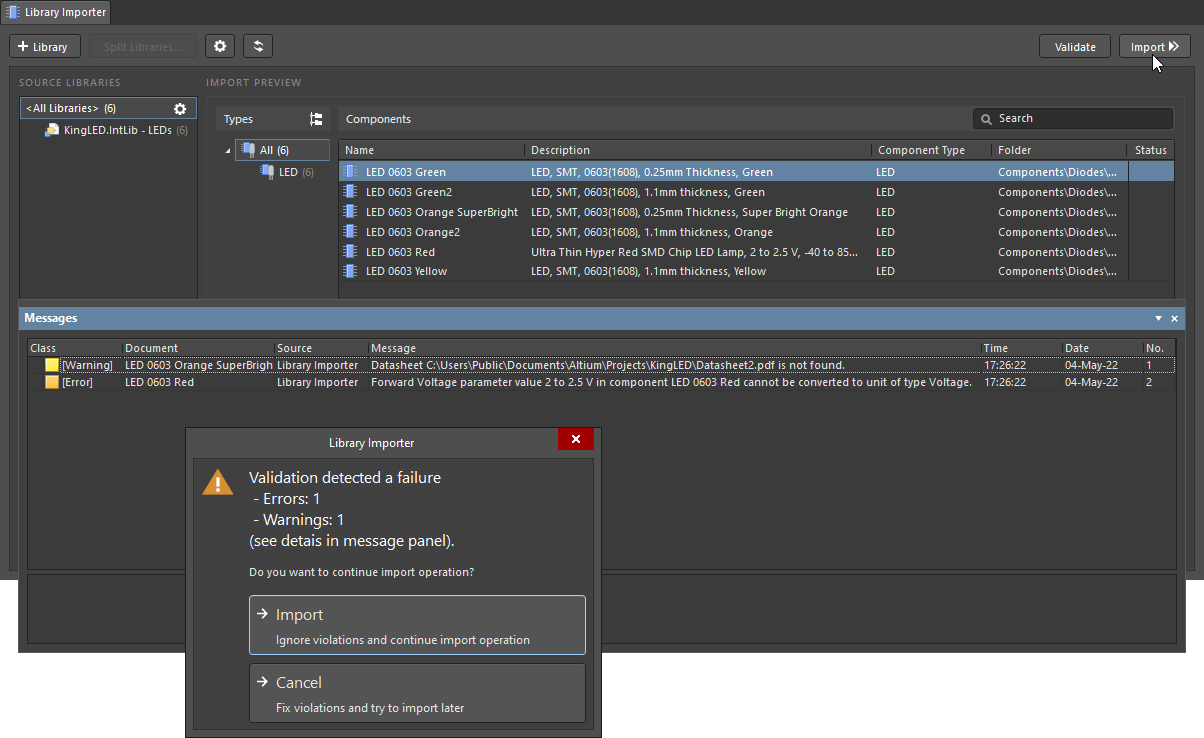
When attempting to perform the import, the Messages panel is populated with the detected violation issues, and a dialog will offer the choice of abandoning or proceeding with the current import configuration. In the latter case, invalid components are not imported or the import process will fail.
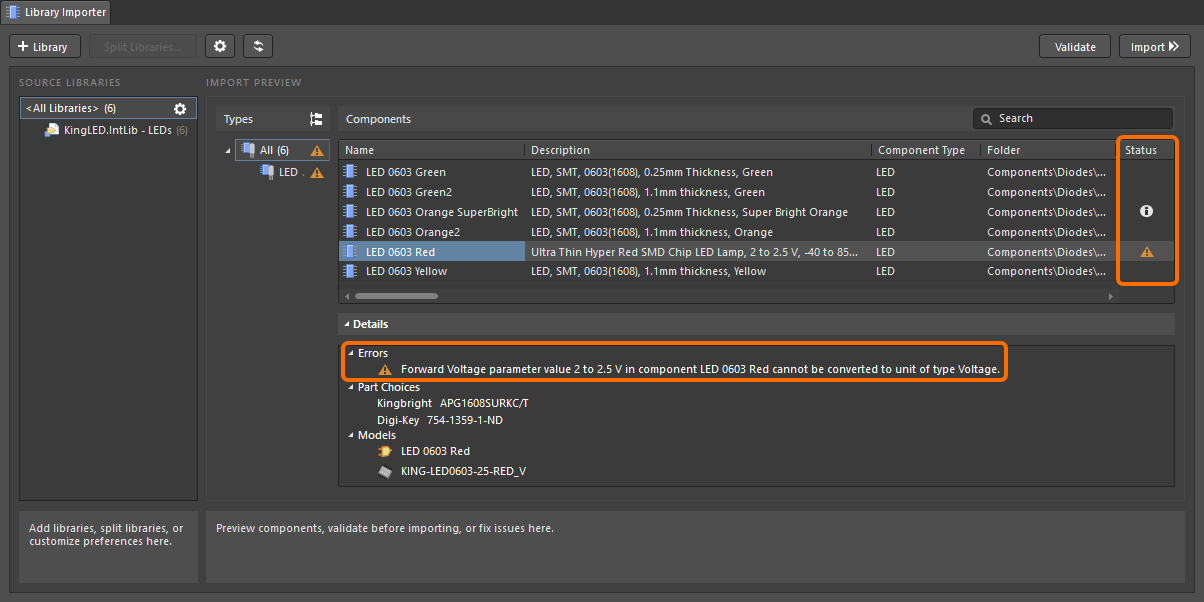
In the case of a canceled import or when the manual Validation is run, any components that fail the import checks are then associated with error/warning icons plus further information in the lower Details area. Icons in the preview Status column indicate the specific component entries that are in violation of the import rule checks.
Resolving Errors and Warnings
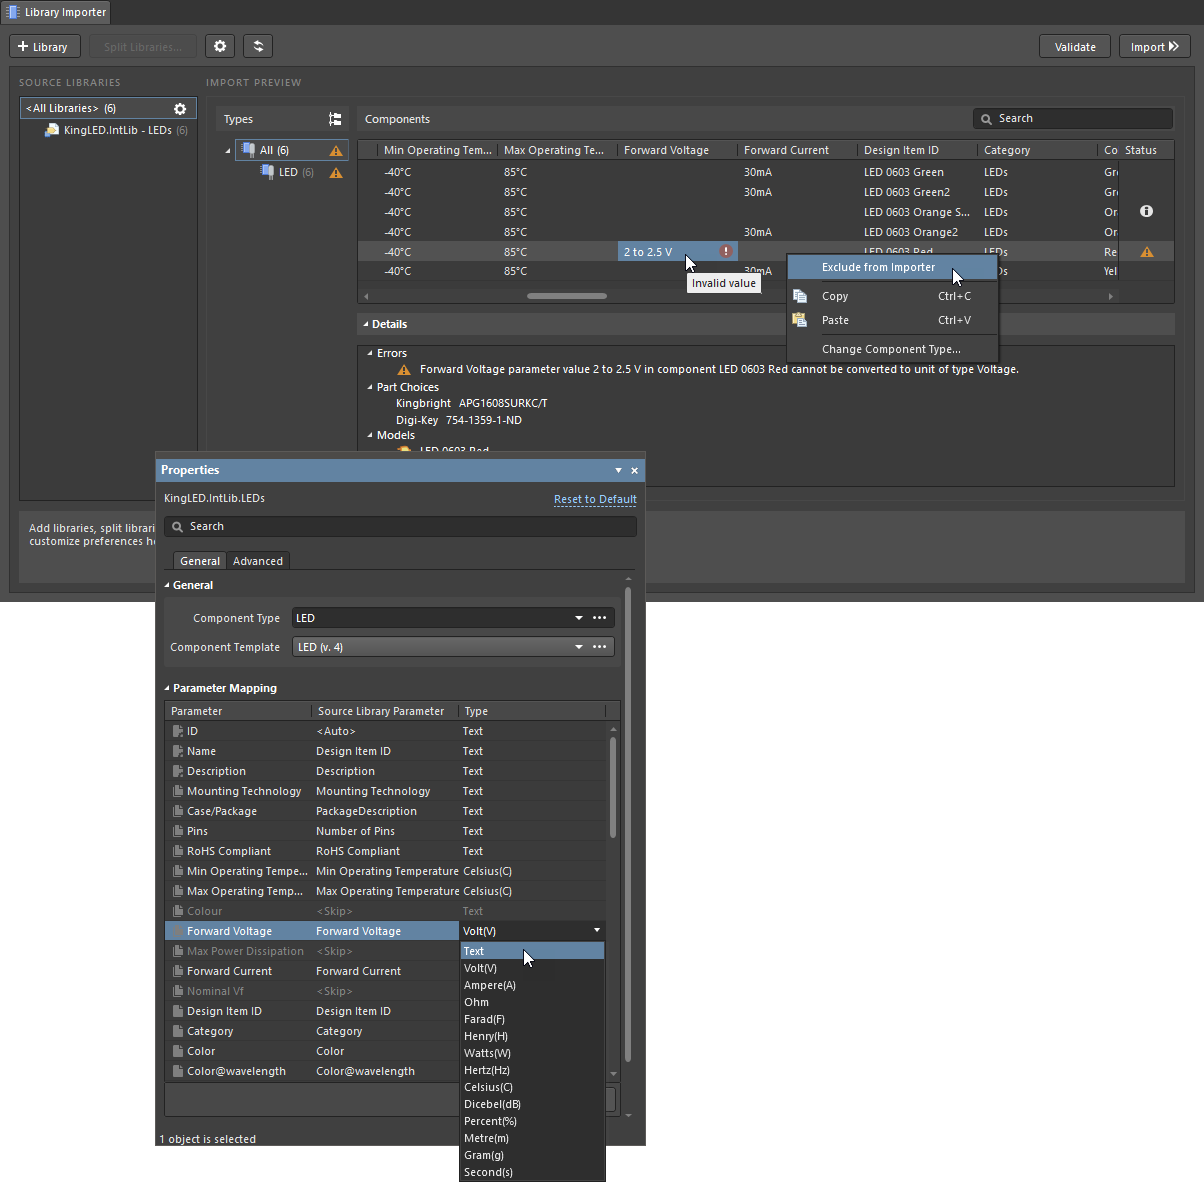
Parameters errors, such as in the example shown here where the component's Forward Voltage value cannot be interpreted to a valid voltage, can be resolved by:
- Editing the offending parameter Value – locate and edit its cell to a compliant format.
- Changing the mapped parameter unit Type, as determined by the applied Component Template, from
Voltageto uninterpretedText– select the Source Library in the importer UI, and then change theForward VoltageType in the Properties panel Parameter Mapping list (under the General tab). - Removing the component from the import process – right-click on its entry and choose the Exclude from Importer option.
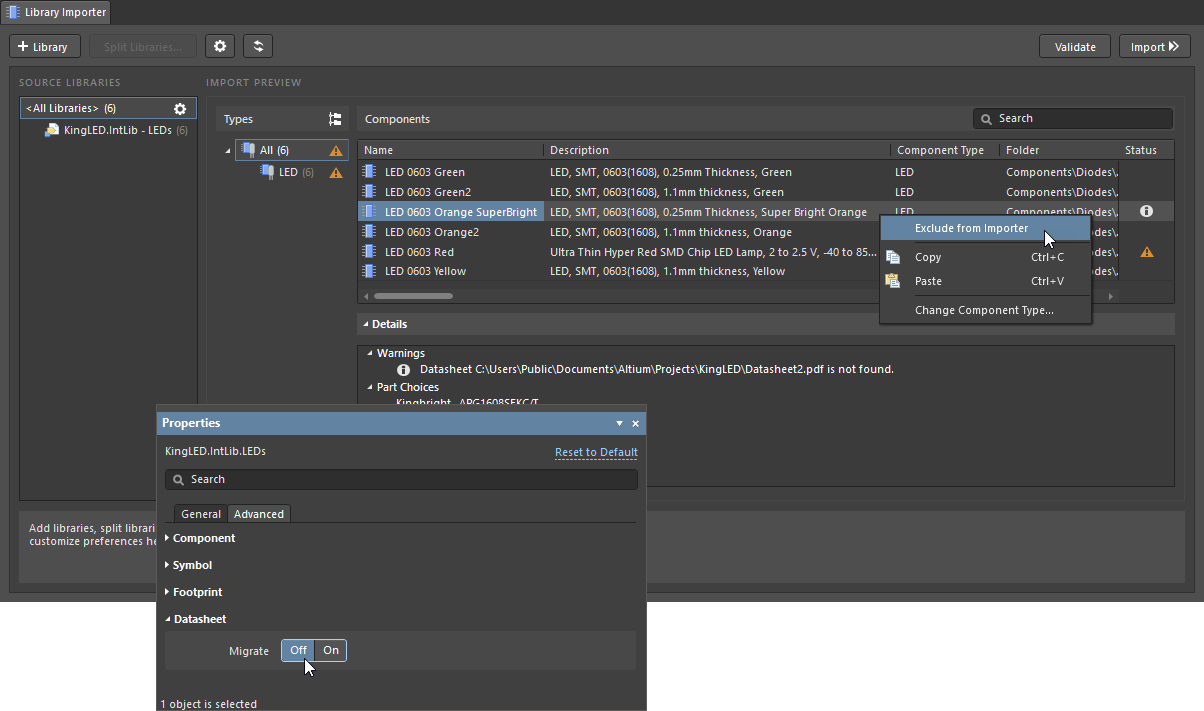
A missing file error, such as the unlocatable Datasheet file shown here, can be resolved by:
- The obvious solution of locating and restoring the missing file to the expected location.
- Disabling the import of datasheet files – change the Migrate option in the Properties panel Datasheet section (under the Advanced tab).
- Excluding the component from the library import process – as described above.
Use the Search field (upper right) if you wish to find particular component entries. The search filters the item listing by matched parameter value(s) for the currently selected component type – select All under Types (Folder Structure) for the search to apply to all components in the available source libraries.
Schematic Library Import
If you encounter a 'model not found' error (such as Footprint <footprint name> not found in available libraries) when attempting to import a schematic library, it means that the Library Importer cannot locate the models that are linked to components within the SCHLIB.
In Simple Mode, such errors will be shown in the HTML-based Importing Report, accessed from the ![]() button that is available when the import has been run. In Advanced Mode, the errors are indicated by Status icons in the main interface (
button that is available when the import has been run. In Advanced Mode, the errors are indicated by Status icons in the main interface (![]() ) and as entries in the Messages panel – this occurs when performing a validation check (
) and as entries in the Messages panel – this occurs when performing a validation check (![]() ) or when attempting to import the library (
) or when attempting to import the library (![]() ).
).
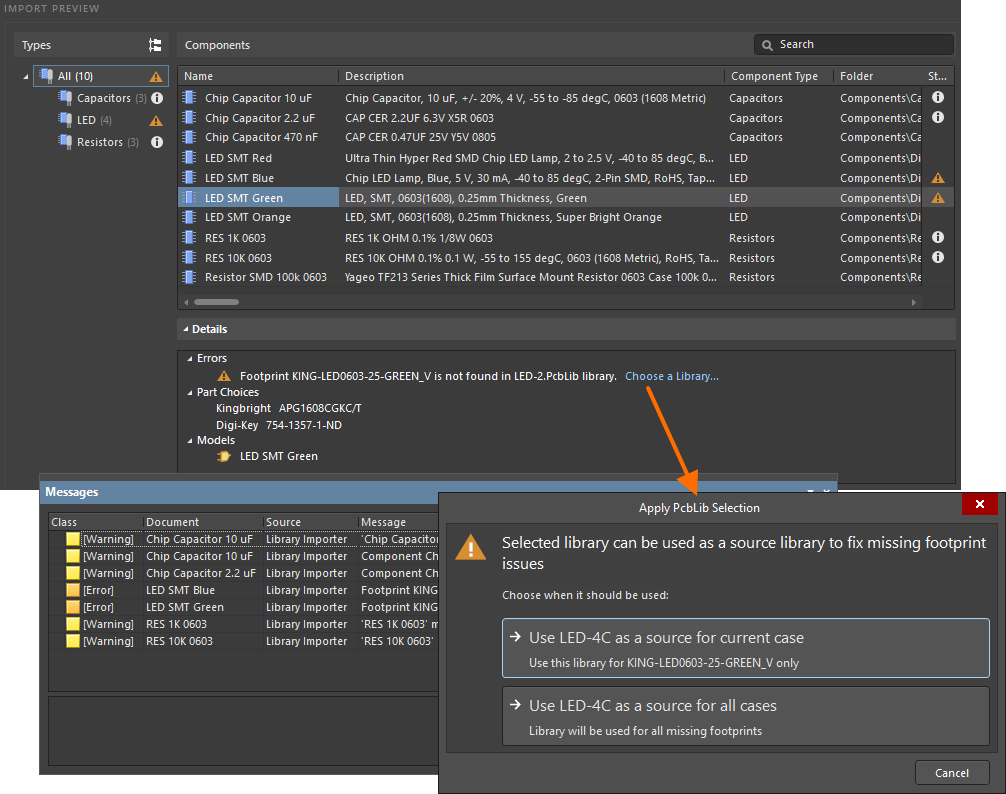
Missing footprints are correctly detected by the Validation process, which also provides a Choose a Library option in its error report (under the Details drop-down). In the case where more than one component footprint has been detected as missing, an Apply PcbLib Selection dialog provides options to use the specified PcbLib for this instance or for all components with missing footprints.
Another way to resolve (or avoid) this issue is to ensure that the required model library files are available from within Altium Designer. Libraries are installed through the Data Management – File-based Libraries page of the Preferences dialog.
Alternatively, if you do not wish to install multiple model libraries, you will need to locate them in the software's default library path (or edit the path), and check that the model source library is specified for the Schematic Library components:
- Include the model library in the software's default search path location. Add the model library, such as a corresponding PCB library, to the location specified by the system's default library path. To check this location, see the Library Path entry on the System – Default Locations page of the Preferences dialog. If a library file has been added/copied to that path location, you may need to restart Altium Designer to register the change.
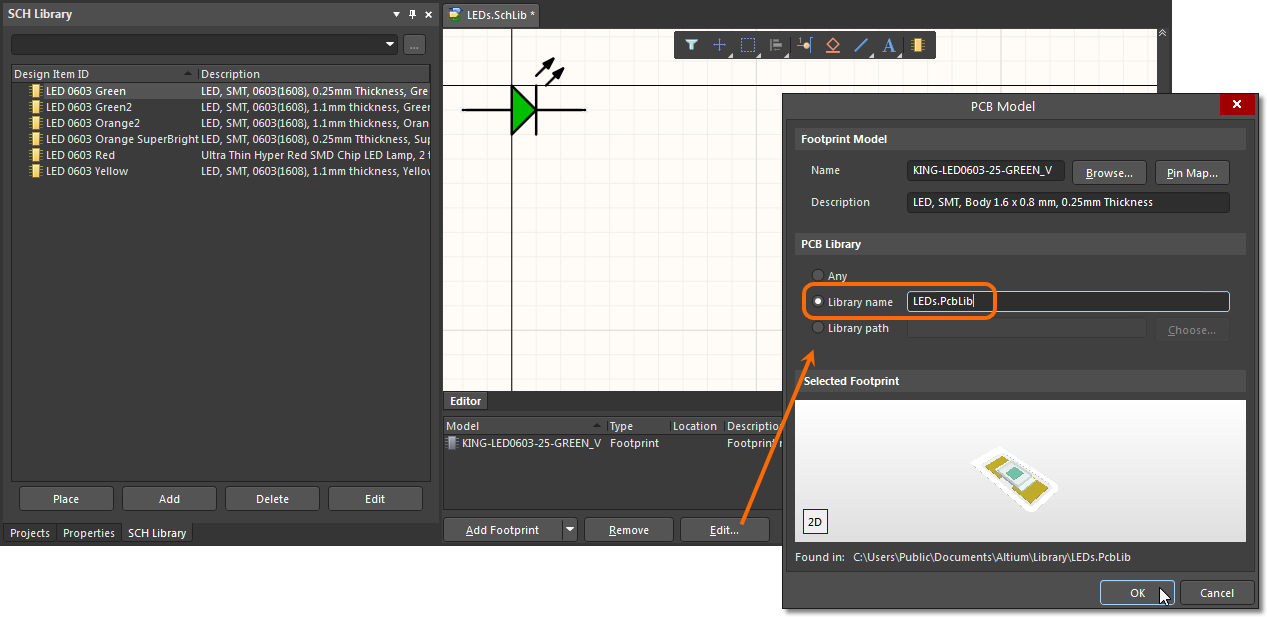
-
Specify the target model library name for Schematic Library components. So that the model library linked to by a schematic library component will be known to the Library Importer, specify its name in the library PCB Model dialog.
Duplicates Detection
The Library Importer also includes mechanisms to avoid duplicate components being created in the target Workspace. This is achieved during validation by comparing the source library's component identifier parameters and Part Choices with those of components in the target Workspace and in the source libraries to be imported. With the importer's default settings, a Validation step (![]() ) will flag a Warning message when the same component
) will flag a Warning message when the same component Name or Part Choices entry (indicating a potential component duplicate) is detected. The displayed warning/error message includes the type of duplication violation (parameter or Part Choice), the violating library component name, and the component (by ID) it is in violation with.
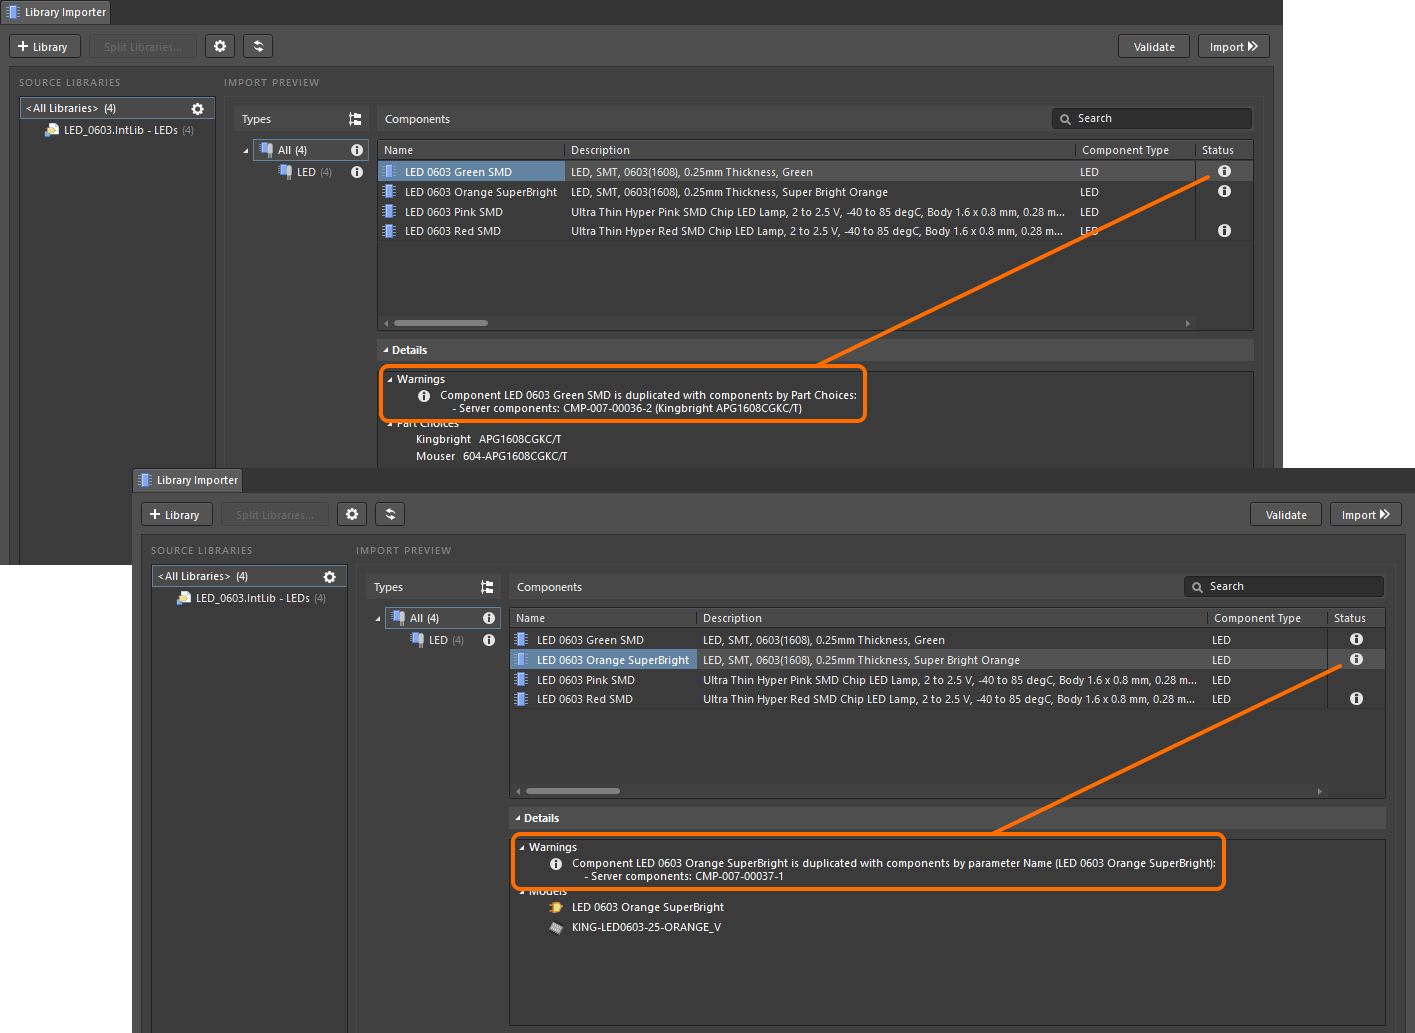
Two potential duplications detected by the Validate process, where the component's Name (top image) or its Part Choice (lower image) already exist in Workspace components.
The parameter name-value pair used to detect duplicate violations is specified in the Duplicates Detection region of Properties panel, under the Advanced tab. Use the Unique Field drop-down menu (set to Name by default) to select from the Parameters available in the source library. This selection is particularly useful for company library configurations that use a proprietary identifier field that ties into the broader enterprise system.
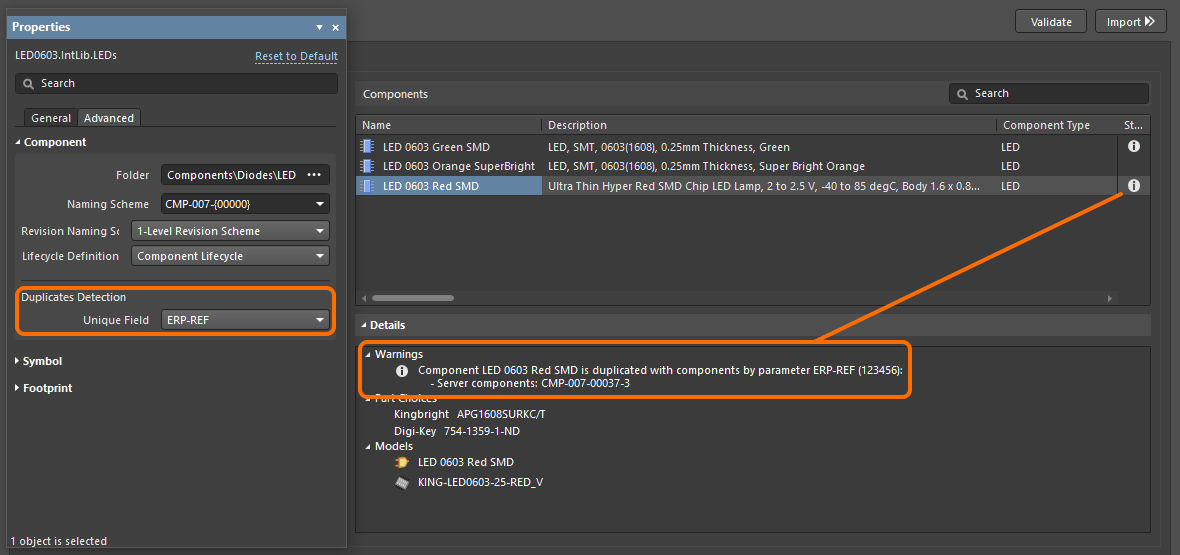
A duplication violation detected where the value of a specified parameter (ERP-REF) is the same for a local library component and a Workspace component.
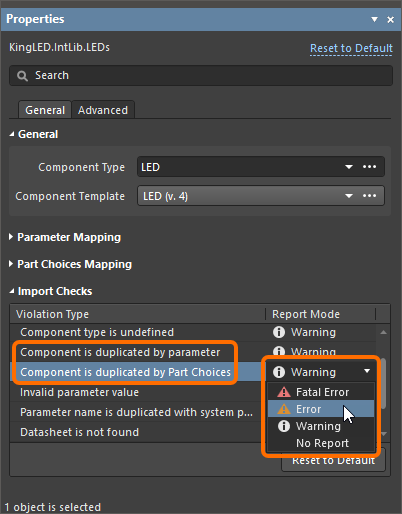
A different type of status flag can be set for the duplication violations by selecting an alternative Report Mode in the Import Checks region under the General tab of the Properties panel.
Detection of duplicates is also performed for component models. If components to be imported have models with the same geometry in the source libraries, only one of these models will be imported. This duplicate check can be enabled/disabled by using the LibraryMigrator.DuplicatedModelCheck option in the Advanced Setting dialog, available from the System – General page of the Preferences dialog.
Single Model Libraries
Automated duplicate detection also is used to process source libraries that use a common symbol model for all components. Such libraries tend to be composed of a single component type with differing styles and values, such as resistors of a particular package format, where the symbol for each is a standard model graphic.
This single, common model condition is detected by the Library Importer, which then configures the import to transfer one symbol model that applies to all imported components – rather than a corresponding, individually named symbol for each component. The symbol to be imported adopts a name of one of the symbols to be imported, and all component parameters remain unchanged.
The imported library symbol (which has the generic name and a blank Description field) can be edited to suit your needs. In the Components panel, use the right-click Edit option to invoke the action. During the process, select the Update items related to <symbol ID> option in the Create Revisions for Item dialog to ensure that the imported components use the new symbol revision.
Models Only Import
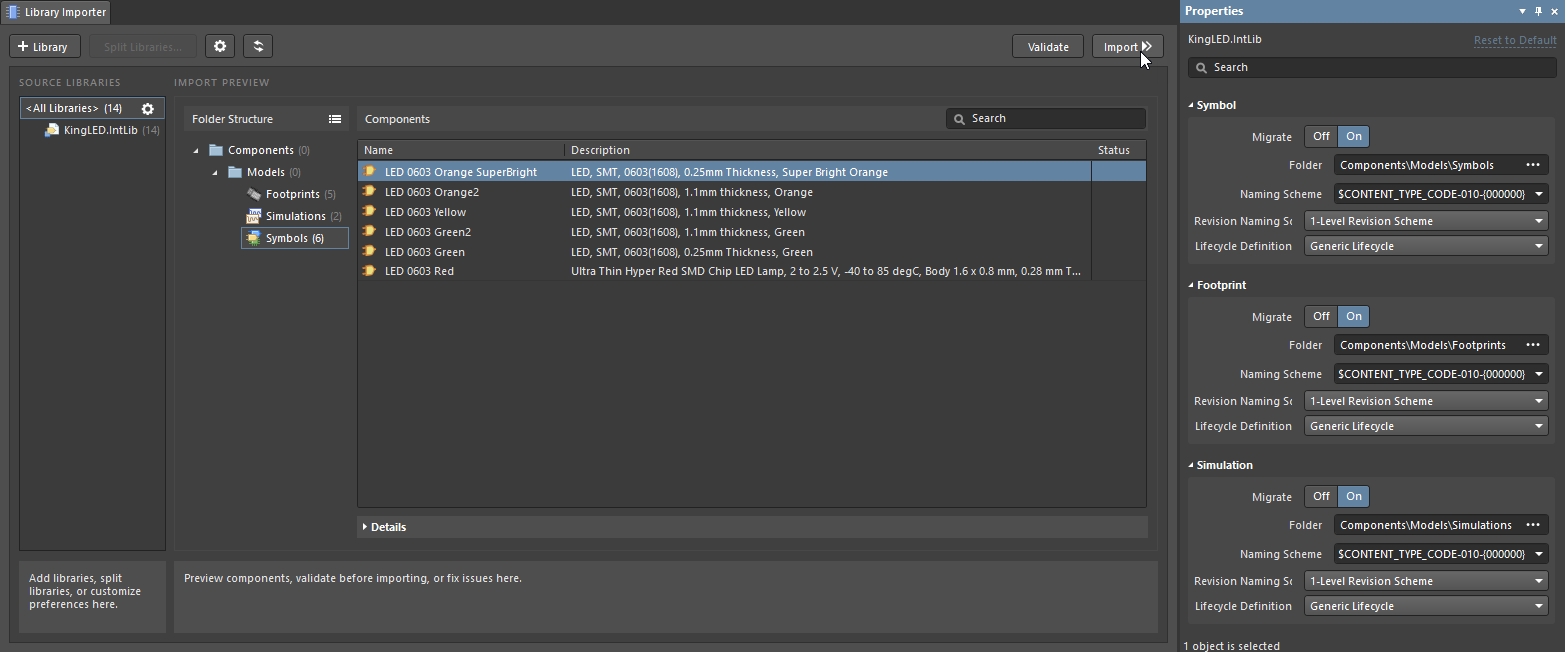
The Library Importer may be switched to a special Models Only import mode that detects and processes the available component models in a source library. To change to this importer mode, check the LibraryMigrator.ModelsOnlyMode option in the Advanced Setting dialog, available from the System – General page of the Preferences dialog.
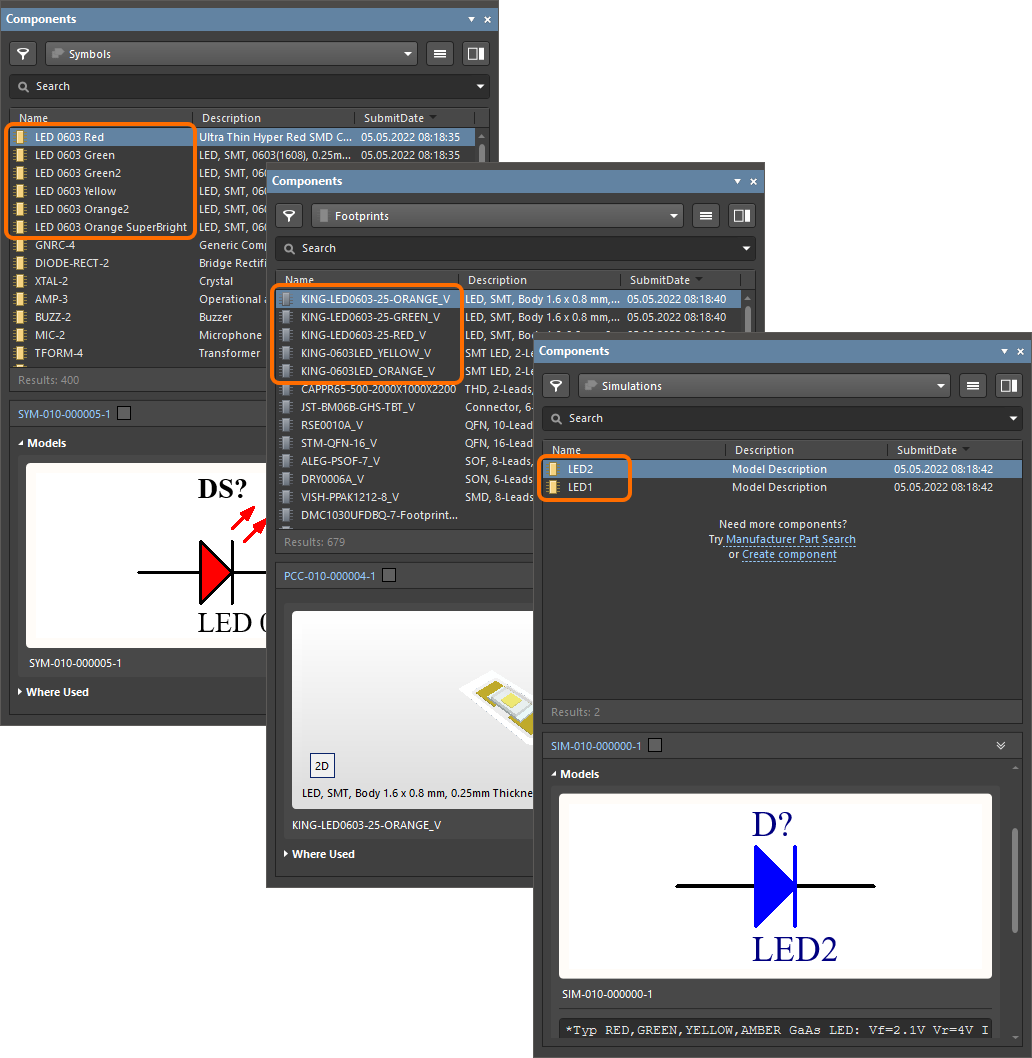
In the Models Only mode, the importer's analysis process will detect all Symbol, Footprint and Simulation models that are available in a source library (IntLib, SchLib, PcbLib, etc.,), then import those models to the Workspace using the system's default locations, naming schemes, and lifecycle definitions.
When the Library Importer is switched to its Advanced mode (![]() ) or opened in its Advanced mode (File » Library Importer), full details of the proposed model import are available. The Import Preview region shows the Folder Structure that will be used in the target Workspace, which may be modified from the default settings in the Folder field for each model type in the Properties panel. The applied naming schemes and Lifecycle definition for each model can be selected from the available system types (see Properties panel, below).
) or opened in its Advanced mode (File » Library Importer), full details of the proposed model import are available. The Import Preview region shows the Folder Structure that will be used in the target Workspace, which may be modified from the default settings in the Folder field for each model type in the Properties panel. The applied naming schemes and Lifecycle definition for each model can be selected from the available system types (see Properties panel, below).
The import of component models to the Workspace can be limited by type if desired, by disabling (or enabling) specific model types in the Properties panel using their associated ![]() buttons.
buttons.
Once the Library Importer is configured, select the ![]() button to complete the import of the listed component models. The results can be reviewed in the import log file, as offered by the Library Importer progress dialog (
button to complete the import of the listed component models. The results can be reviewed in the import log file, as offered by the Library Importer progress dialog (![]() ), or by viewing the imported models in the Components panel.
), or by viewing the imported models in the Components panel.
Components Only Import
Similar to the Models Only import mode described above, the Library Importer may be switched to a special Components Only import mode that allows you to import the available components in a source library without their linked models. To change to this importer mode, check the LibraryMigrator.ReleaseComponentsWithoutModels option in the Advanced Setting dialog, available from the System – General page of the Preferences dialog.
In the Components Only mode, the importer's analysis process will detect all components, parameters, and Part Choices in a source library, then import these components to the Workspace using the system's default location, naming scheme, and lifecycle definition.
When the Library Importer is switched to its Advanced mode (![]() ) or opened in its Advanced mode (File » Library Importer), full details of the proposed component import are available. The applied folder, naming schemes, and Lifecycle definition can be selected from the available system types (see Properties panel, below).
) or opened in its Advanced mode (File » Library Importer), full details of the proposed component import are available. The applied folder, naming schemes, and Lifecycle definition can be selected from the available system types (see Properties panel, below).
Once the Library Importer is configured, select the ![]() button to complete the import of the listed components. Only component items will be created in the Workspace, without any linked models. The results can be reviewed in the import log file, as offered by the Library Importer progress dialog (
button to complete the import of the listed components. Only component items will be created in the Workspace, without any linked models. The results can be reviewed in the import log file, as offered by the Library Importer progress dialog (![]() ), or by viewing the imported components in the Components panel.
), or by viewing the imported components in the Components panel.
Properties Panel
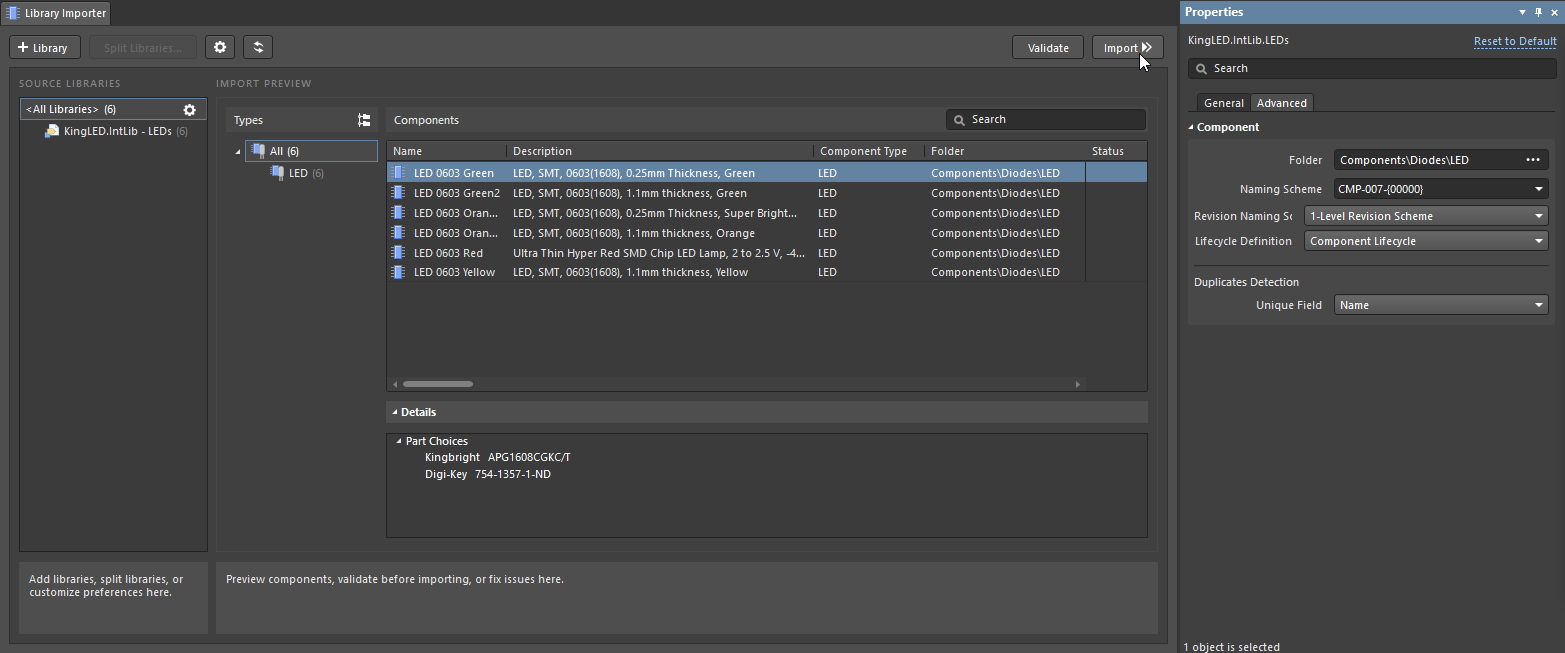
The Library Importer's associated Properties panel settings provide advanced control over the import configuration for the selected library (or sub-library group). The panel can be accessed from the Library Importer's Advanced mode by selecting the Properties option from the ![]() button menu (at the lower right of the design space), by clicking the
button menu (at the lower right of the design space), by clicking the ![]() button at the top right of the Library Importer view, or by clicking the
button at the top right of the Library Importer view, or by clicking the ![]() button next to the
button next to the <All Libraries> or a specific category entry in the Source Libraries list.
The panel's option settings are defined by the default system settings or those specified by the applied Component Template, which in turn is set by the library's detected component type – LED in the example shown here. The settings are also user-editable, allowing you to tailor the import process as required, and may be restored with the Reset to Default link (top right).
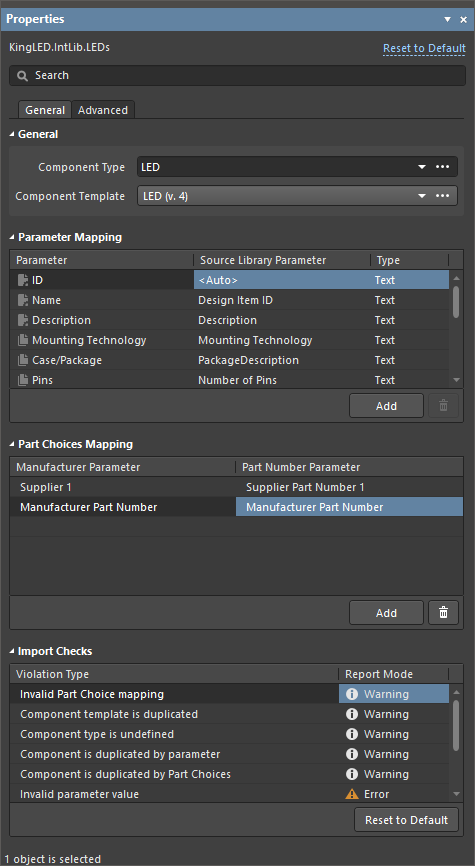
The panel's General tab sections are as follows:
- General:
- Component Type – the type of component detected by the importer for the selected library, and by association, the template that is applied (see Component Template below). Overrule this setting by editing the field, which will create a new component type, or by selecting an alternative type using the drop-down menu options (or via the
 button) – this is another way to address an uncategorized component issue. Choose the
 [LibraryName]option to set the type to be the name of the selected library. -
Component Template – the Workspace Component Template that will be applied to the imported components, and by association, their Component Type setting. Overrule this setting by selecting an alternative template using the drop-down menu options (or via the
 button). Set this option to
 [Create new]for the automatic creation of a template derived from the source library parameters and the Library Importer's current settings, or choose [No Template] to prevent a template from being applied or created.
- Component Type – the type of component detected by the importer for the selected library, and by association, the template that is applied (see Component Template below). Overrule this setting by editing the field, which will create a new component type, or by selecting an alternative type using the drop-down menu options (or via the
-
Parameter Mapping – the parameter matching between the library parameters and those in the applied component template (or the default settings where no template is available), and also the Type of value for each parameter (Text or a unit-aware type). Use the Source Library Parameter column drop-down menu options to change the mapping, and the Type column menu options to overrule the existing setting determined by the template or defaults. Choose the
<Skip>option to not include a parameter. Any parameter that has not automatically been matched to a source library parameter (is set to<Skip>by the system) can be manually mapped to a suitable Template parameter – for example, the source parameterROHSmight be selected to match theRoHS Compliantparameter defined by the Workspace template. Parameter names can be edited, and Parameter sets can be added, edited, and removed. The base component parameters (ID,Name,Description) may be remapped, but are otherwise read-only. - Part Choice Mapping – the list of manufacturer part or supplier link parameters recognized by the importer, which will be used to derive Part Choices entries for imported components. Use the drop-down menu options to redefined the mapping, or add and delete mapping sets. Note that by default, manufacturer part and supplier link parameters are not included (are skipped) in the import process. Where multiple supplier links are included with a library component, the primary supplier reference (
Supplier 1/Supplier Part Number 1) is used for the Part Choices field entries. - Import Checks – view or set the importer's error/warning response to violations of the import validation rules. Use the Report Mode drop-down menu to change the response and icon for a Violation Type entry. Note that if the
Fatal Errorreport mode is selected, it will block the import process when this violation is detected.
The panel's Advanced tab offers settings for all importer data object items, as set by the system defaults or the applied Component Template. These include component Models, Datasheet files, and any created Component Templates. With the exception of the Datasheet option (an enable/disable toggle) the settings for each import object include:
- Folder – the target Workspace folder for the imported object, which may be manually edited (say, to create a new target folder) or selected via the browse button (
 ).
). - Naming Scheme – the object's Workspace naming specification as defined by the Component Template, or in the absence of an active template, the scheme set for the target folder (or as manually entered). Use the drop-down menu to choose from the available Naming Schemes. Note that a change in target folder path (Folder) may be accompanied by change in the applied Naming Scheme, as set by the folder itself or by an applied/associated Component Template.
- Revision Naming Scheme – the naming arrangement used for the object's Workspace revisions, as set by the applied template or selected from the entry's drop-down menu options. Only those schemes enabled by the system will be available as an option.
- Lifecycle Definition – the Lifecycle system that is used for the object, as set by the applied template or selected from the entry's drop-down menu options. Only those definitions enabled by the system will be available as an option.
Export-Import Configuration
The Library Importer features the ability to export a detailed text-based file that captures the current configuration setup, which includes all configurable import settings such as target paths, parameter mapping, naming scheme, lifecycles definitions, target component types, and so on.
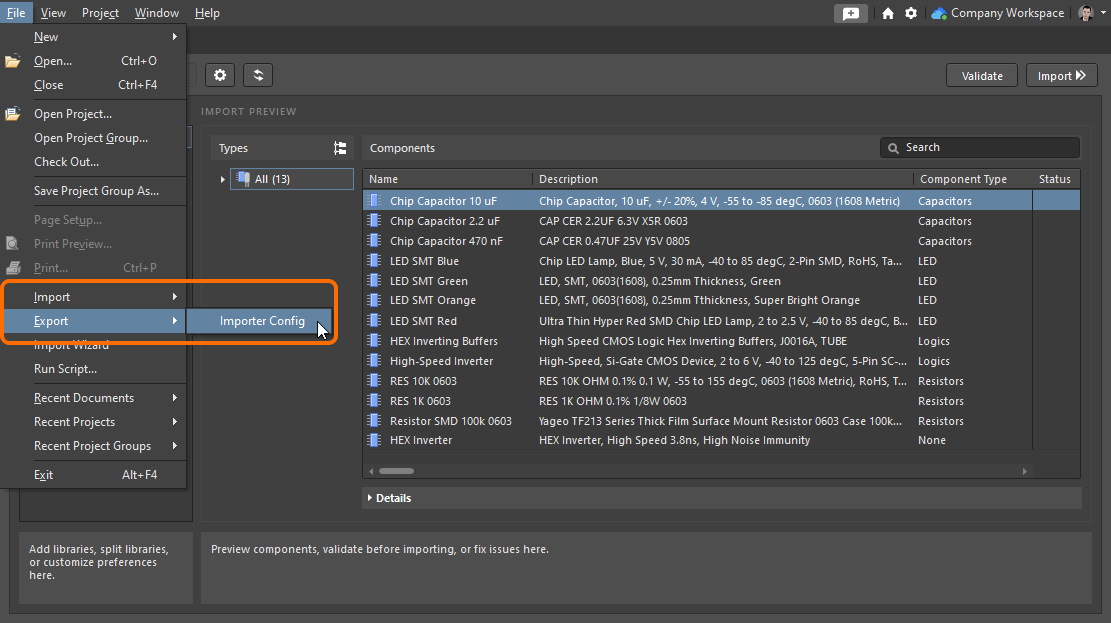
The Importer Configuration file is saved from the File » Export » Importer Config command as a *.lmcfg file type and may be restored at any time through the File » Import » Importer Config menu option.
The ability to restore a configuration is particularly useful when the source database or file-based library has been updated and those changes need to be imported to the Workspace. If the configuration was exported when the library was first imported, the restored (imported) configuration will re-establish the exact configuration settings that were used, which guarantees a consistent data transfer scheme for that library (or libraries).

