Project Release Options
This document is no longer available beyond version 22. Information can now be found here: Configure Server Release for version 24

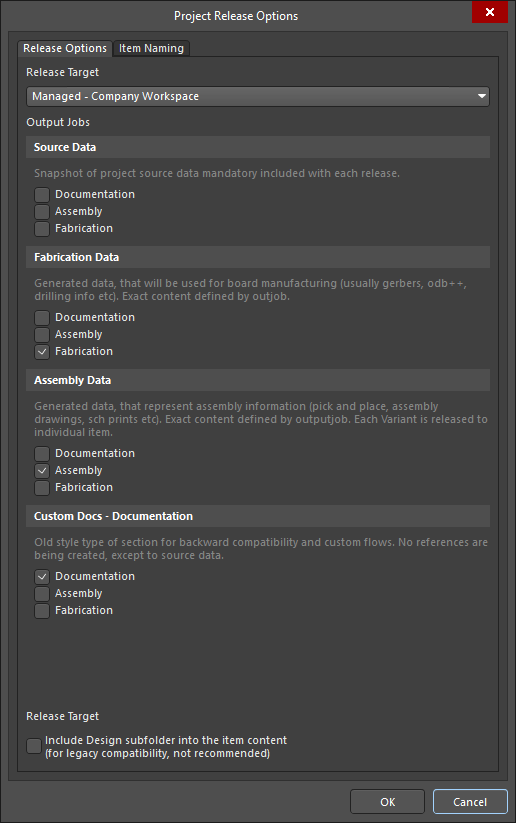
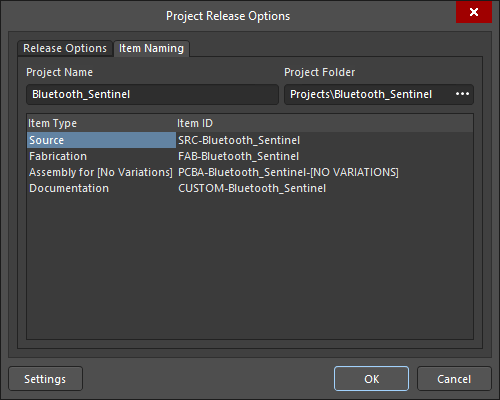
 The Release Options tab and Item Naming tab of the Project Release Options dialog
Summary
The Project Release Options dialog is used to assign the applicable Outjobs and define how the target data items in a Workspace (whose revisions receive the generated data) are named (for online release) or define the output path for release data (for offline release) when releasing a project.
Access
The dialog is accessed in the following ways:
- Click Options in the Release view of the Project Releaser (Project » Project Releaser).
-
From the Project Releaser, click on the Target Revision link for a data set to be released then choose Edit from the context menu.
Options/Controls
Release Options Tab
-
Release Target - use the drop-down to select a release target.
Managed - <WorkspaceName>– select to release to the specified Workspace.Unmanaged - Folder– select to release locally in offline mode to a folder.Unmanaged - Zip– select to release locally in offline mode to a zip file.
-
Output Jobs
- Source Data – enable the desired project source data.
- Fabrication Data – enable the desired data that will be used for board manufacturing (e.g., Gerber, ODB++, drilling information, etc.). The exact content will be determined by the Outjob.
- Assembly Data – enable the desired data that represents assembly information (e.g., pick and place, assembly drawings, etc.). The exact content will be determined by the Outjob. Each variant is released to an individual item.
-
Release Target
-
Include Design subfolder into the item content (for legacy compatibility, not recommended) – enable to include the design sub-folder.
-
Item Naming Tab
- Project Name – use to define the name for the project. By default, this will be filled with the actual name of the project. Enter a new name if desired.
- Project Folder – use to define the top-level target folder in the Workspace into which the data will be released. Click
 to open a dialog in which you can search for and select a different folder.
 -
Item Type/ID – displays the default naming schemes for the various data items that can be generated as part of the release. Click within a field in the Item ID column then click the
 button at the right of the field to access the Choose Item dialog (an incarnation of the Explorer panel), which allows you to target an existing Item in the actively connected Workspace.
 - Settings – click to open the Naming Template Settings dialog in which you can change naming schemes if desired.
Output Path Tab
- Folder Path (for release to a local folder) – use to define the root folder path for output data. By default, this is set to
[OutputPath](using the path defined in the Output Path field, on the Options tab of the Project Options dialog). - Zip Path (for release to a Zip file) – use to define the Zip path/name which the output data will be packed into. By default, this is set to
[OutputPath][ProjectName].zip(using the path defined in the Output Path field, on the Options tab of the Project Options dialog).
